Friday, December 30, 2011

The Day After Christmas


Can you believe it? The day after Christmas and we went for a walk on the warm, sunny beach!

As Emily says "Look, Emily tracks!"

We found lots of shells!

Our move has taken us to an entirely different world. Back home, it's cold and snowy, here we're all wearing sweaters because it's 73 degrees! We miss RI, but we're also really enjoying it here.


Keys to the Home Sweet Home


I found this idea on Pinterest, originally pinned by Kim West of the blog "A Girl and a Glue Gun." It's the key from our house in RI - the first house we lived in together.

Thursday, December 29, 2011

Barrette, Headband and Photo Holder


I am so excited about this! Mostly because of the amazing fabric. But also because I made it! This is how I made mine:

Step 1:
Acquire a piece of plywood the size you'd like your holder to be. This can be the hardest part, as most plywood comes in 8'x4' slabs. That's a lot of plywood.

Step 2:
Cut an appropriate length of quilt batting, roughly the size of your plywood, but with a little overhang. Using a staple gun, staple the overhang to the back of your board.

Step 3:
In a similar fashion, cover the board with the fabric and staple to the back. You want the fabric to be tight and smooth, but not so tight it has no give.

Step 4:
Decide where you want your ribbons to go, and staple them to the back. (Well... of course.)

Step 5:
Attach two small eye-hooks to either side of the back of the board and run a wire between them. Wrap the ends of the wire around itself to fasten. (I found my hooks and wires in a kit at Lowe's.)

Step 6: (Optional)
My photo holder has a decorative bow to give the appearance of the holder hanging from a ribbon. It's not. I just made a nice bow, reinforced it with hot glue, stapled it to the the board, and places a tiny nail under it.

I made all the barrette, and you can find a tutorial here on my blog. (October archives, I believe.) I did not, however, make the picture of the butterfly woman. I wish...

(Edit: I changed the decorative ribbon at the top)


Monday, December 26, 2011

Monogrammed Tote

This awesome tote was a free gift from a magazine subscription. I love the stripes and colors, but it was missing something. So I pulled out my Cricut! Using the Sophisticated cartridge, I cut my H into some vinyl. I peeled the back off the "negative," applied it to my tote, and used it as a stencil. I used Plaid acrylic paint in Bahamas Blue.

Thursday, December 22, 2011

Toothless the Dragon - with Earflaps!

 A customer just ordered a Toothless hat with earflaps and tassels! How cute is that?!


Wednesday, December 21, 2011

Fancy Nancy Christmas Ornament

It's about time I posted some Christmas decorations! This is a Fancy Nancy glass ball. Michaels has a new, incredibly cute line of Fancy Nancy scrap-booking supplies, including this adorable little crown. I just smoothed in onto a clear glass ball (I'd use a bigger one next time,) filled it with pink feather, added some ribbon, and - to quote Fancy Nancy herself- Oooh La-la! So Posh!


Tuesday, December 20, 2011

Christmas Time

 It's five days before Christmas and it's 78 degrees outside.

 Having grown up in New England, this is not normal for me. By now the leaves have long since fallen off the trees, the landscape is shades of blue, brown, grey and white. We've seen a little bit of snow, and have our fingers crossed for a white Christmas, even if it's just a bright layer of snow from a few days before. The house has been decorated with garlands, paper chains, and Christmas knick-knacks. All the stockings are on the fireplace, even ones for the pets. We've baked at least four different kinds of cookies, and have brought them to neighbors and friends. 
 This year is different. The grass is still green, as are the palm trees. There are days that are all out hot. The landscape is green and blue, as if it were still summer. There's no chance of snow - instead maybe we'll substitute the white sand at the beach for the white snow in our yards. We've misplaced a box or two of Christmas ornaments, our stockings included, so the Christmas decorations are few. We've baked chocolate chips cookies, but many go stale before we can finish them, as we haven't met many people down here yet. 

 Next year well look back on our scrambled Christmas and laugh. This is the beginning of all our new traditions. Emily will know warm Christmases spent on the beach and palm trees dressed with with lights and ornaments, or Christmases just visiting New England. This is our first Christmas of our new life here in Florida. And it's beautiful.

Monday, December 19, 2011

Merry Christmas to Me!

 My sweetheart gave me my Christmas present early!


Raspberry Ice KitchenAid! Oh, I am in LOVE!

HeatherDoodle Designs Update

Hello, everyone! I just to give you all a heads up: From January 10-February 10, I will be offering 15% off any one hat for anyone who likes the Side Stitches by HeatherDoodle Designs facebook page! Stay tuned, because there just might be a giveaway thrown in there, too....

Monday, November 28, 2011

Christmas Owl

Emily is thrilled to be wearing her new Christmas hat...


Saturday, November 12, 2011

How to Train Your Dragon - Astrid Costume

Happy (Belated) Halloween!

Emily was Astrid for Halloween! I made the costume using some amazing faux suede/leather fabric, metal buttons, velcro and ribbon. The boots and socks were Wal-Mart finds, and I crocheted the fingerless gloves. The headband was just ribbon and puffy paint.

Hats

Just a few hats from my Etsy shop!

Crocheted Viking Hat

How to Train Your Dragon - Toothless Hat

Owlet Hat

Where does the time go??

 Good Lord, what a month. Moving isn't for the faint of heart. Anyway, life is slowly beginning to fall back into a routine, or at least will be soon. I have quite a list of projects to start! In honor of my first post, exactly a year ago, I'm going to start a list of things I need for my upcoming crafts...

Glitter paints
Shimmer paints
Paint brushes
Clear glass Christmas balls
Interior house paint
A large piece/sheet or plywood
Small picture frames
Ribbons
"Pearl" beads
Decorative glass blocks
Christmas lights
Tulle. Lots and lots of tulle.
A foam ring

I love crafting.

Sunday, October 9, 2011

A Lesson in Hair Flowers

 I don't remember if I've mentioned this yet here on the blog, but I'm in love with Pinterest. I pin a lot of pictures from blog posts, and a current favorite among other pinners is my yellow hair flowers. So, I started thinking "Hmmm... I wondering if I'm getting all these hits from people hoping to find instructions. Well, I grabbed my camera and all my supplies, and here are the step by step instructions....

Okay, so here are my supplies. Felt, fabric, scissors, a pencil, a glass and some good music. Like how Hanson's "Middle of Nowhere" album matches the flower? Yeah, I like that, too.

So, you'll take a glass with roughly the same circumference as your ideal flower (You can use a roto-cutter or other cool stuff like that, but I just use a glass.) and trace a circle onto the underside of your fabric. Now do it seven more times. Next, you'll cut them all out.
You should have eight of these. 
Now, fold a circle in half....
Fold one end toward the middle...
And then the other ...
Now place some glue in the center to make sure both sides stick. (I don't recommend laying the glue gin on the table for this step, however, I only have two hands and one of those hands needed to take a picture. Now, repeat this step with the rest of your circles. Now, it's time to really get gluing...

Put a small blob of hot glue on the right half of your little triangle. (Forgive the flash photography!!)
You guessed it! You're going to put the left side of another triangle onto the aforementioned glue glob. 
Side view.
The next triangle will go here. Left side glued to right side again. Repeat until you have a lovely, round flower. You might find you have an extra triangle, maybe not. Anyway, just tuck the right half of the end under the left side of the beginning. 
The middle part is super easy...
Just take a length for ribbon and twist it around and around and glue it to the center.
The last step is to glue your barrette to the back. I like to add some felt or a small circle of fabric to make it nice and secure.

And that's it!!


Tuesday, October 4, 2011

Saturday, October 1, 2011

Fabulous Peanut Butter-Oatmeal Cookies

Yum!

1/2 cup of butter
3/4 cup of brown sugar
1/2 cup of peanut butter
1 TBS vanilla
1 egg
(beat together)
1 cup of flour
1 TSP baking soda
1/4 TSP salt
A dash of nutmeg and a pinch of cinnamon (optional)
1/2 cup OLD FASHIONED oats
1/2 (or 1 cup, depending on preference) chocolate chips (I used white chocolate, but you can use any kind of baking "chip" you like best!)

Bake at 350. Allow 5 cookies to cool for 5 minutes before removing from pan. Transfer to aluminum foil to cool.

Friday, September 2, 2011

Mommy's Little Monster and an Owlet

News hats are up on Etsy!
and...

And on an entirely unrelated note, I saw this butterfly yesterday, enjoying some flowers on the first day of September...


Wednesday, August 31, 2011

Come On, Irene...

Okay, so it was Ilene in the song, you get the idea.

Friday was the perfect late summer day. Warm, but not humid, sunny, breezy, 80 degrees. Then Irene's arms carried clouds and rain on Saturday. On Sunday, she unleashed some strong wind gusts and about 10 minutes worth of rain, resulting in two days without power and three without internet. All in all, I'd say we fared very well and consider ourselves very fortunate.

 It's now August 31, the last day of August. Though summer will continue into September, the elementary-schooler in me still considers September 1 to be the start of Autumn. Tomorrow I'll hear the yellow school bus picking children up and carting them off to school. When the breeze blows through the kitchen I'll swear I can almost smell freshly sharpened Ticonderoga pencils.

 God, I'm glad to be a homeschool Mama.

Monday, August 22, 2011

Dog Days of Summer

 Did you know we get the term "dog dogs" from Sirius, the "dog star," once thought to be responsible for hot weather? Or so says Wikipedia.
 The weather is actually very cool for our neck of the woods right now. I don't think the temperature got past 75 today. (sighs) Autumn is on its way.
 I love Autumn, I really do. It's just that once Autumn flies by (and it always flies by) it gets cold. And after Christmas, days after the start of winter, I don't like cold weather. Not one bit.
 Anyway, gripe gripe, whine whine. It's still August. :-)

Friday, August 19, 2011

 How is it already August 19? I am not ready for summer to be over. My baby is turning four on Sunday. Four years old. Already. I spent a week in the hospital when she was born. When we finally got to go home, we enjoyed the last few days of August and before we knew it it was September. Luckily, here in our state we have Indian Summers which sometimes last until the very end of October.

 I am still clinging to summer. Still clinging to the beach, lemonade, afternoons by the pool, cook outs, shorts, air conditioning, and all that coastal summer stuff.

Monday, August 15, 2011

A Very Fancy (Nancy) Birthday Party

 My baby girl is turning four! Though her birthday isn't until next weekend, we had her party yesterday....
I embellished an cheap-o cardboard cupcake tower from A.C Moore with some ribbon, scrapbook paper and a feather boa. (And yes, the cupcakes are home-made. Frosting recipe to follow.)

I used my Cricut to cut out letters and rectangles, then laminated them to make them sturdy. After they were laminated and cut out, I punch holes in each one and tied them together with some satin ribbon.


I made six mason jar lantern/centerpieces, (which would have looked so much cooler outside) once again using my Cricut. I just cut scroll-y, chandelier-y shapes out on pink vinyl, applied the cut-out to the jar, and added some flair with rhinestones.

And now for the frosting recipe. I found this on the crisco website, I think. Anyway, it's 
1 cup of butter (I like to use salted)
1 cup of vegetable shortening (crisco)
Mix for AT LEAST 20 MINUTES! This is a MUST. Do not skip this step.
Beat in 1-2 Tsp of vanilla
Add 7-8 cups of of powdered sugar
If the frosting is too thick, slooooowly add a tiny bit of milk at a time to thin it out.


My computer is acting up again ... so we'll just have to wait for more pictures. :-)


Wednesday, August 10, 2011

Beautiful

 I live a beautiful life. It's not perfect or extraordinary, but blessed. I am surrounded by beauty.

The beauty of green, ripening tomatoes in my garden,

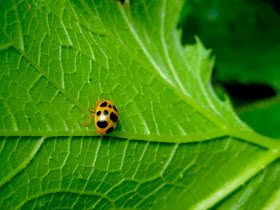
of the orange bugs eating my zucchini leaves (sigh),

of rainy days turned sunny, or in this case, rain in the midst of a sunny day,

or curled up morning glories.

And of course, my two favorite people. <3